

Blog
How a Kinetic Anti-Drone System Hunts Rogue UAVs
1. Disclaimer and Warning
The Hunter Air Kinetic Anti-Unmanned (Drone) System-Individual Model is designed to safeguard national security and public interests by preventing illegal entities from exploiting drones to endanger social safety. This product is specifically developed for countering intruding drones. The identified drone feature images and data will not be utilized for any purposes other than drone countermeasures.
As the end user of the device, you hereby warrant that you and any authorized users are fully aware of and comply with all applicable laws and regulations, and that the device will not be used for any purpose other than serving public safety. You undertake full responsibility for any use of the product and its consequences, and shall compensate Beiye Intelligence for any losses resulting from your actions. Beiye Intelligence shall not be liable for verifying your identity or any actions related to the device, nor shall it be held responsible for any infringement or damages caused by you.
If you do not object to this statement before using the countermeasure device, you will be deemed to have accepted all its contents and will be fully responsible for any consequences resulting from a violation of this statement.
2. Product Overview
The Hunter Air Kinetic Anti-Unmanned (Drone) System-Individual Model is a single-soldier combat system designed to effectively counter intruding drones within a designated defense zone using high-speed drones and AI-guided airborne systems. The AI-guided system automatically identifies aerial targets (including multi-rotor and fixed-wing aircraft) within the video coverage area for locking and counteraction. Upon activation, it automatically launches pursuit drones to intercept and neutralize the targets.
3. List of articles
- High-speed drone (including battery and propeller attachments) *1
- Single soldier launcher*1
- Aiming at the display screen (including the video receiver and battery) *1
- Unmanned aerial vehicle remote control (with battery) *1
4. Component Description
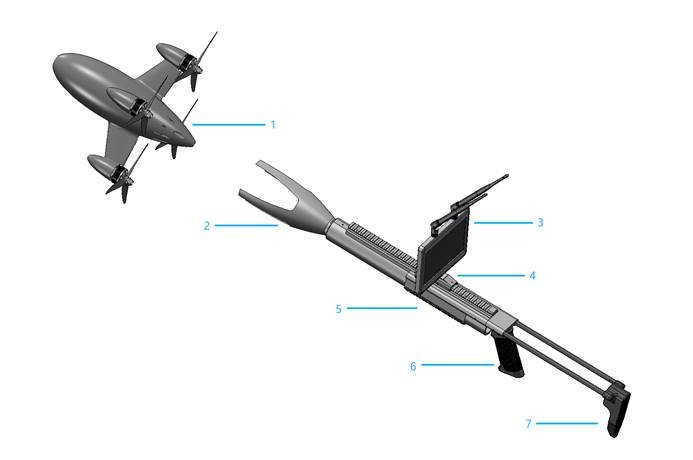
- High-speed drone: Aerial target pursuit and countermeasure (maximum flight speed 350 km/h);
- Launch tray: to carry and support high-speed Kinetic Anti-Drone System;
- Aiming display screen: designed to receive and display real-time footage from high-speed drones (digital video transmission systems will be equipped with digital receivers).
- Display position adjustment slider: used to adjust the displays proximity and connect with the transmitter;
- Single soldier launcher body and lower guard: used to hold the launcher to make the system more directional;
- Transmitter handle: for holding the transmitter;
- Transmitter shoulder rest: for shoulder aiming;
5. Function declaration
5.1 target recognition function
The system detects aerial targets (including multi-rotor and fixed-wing aircraft) in the video range by analyzing camera image features from the airborne AI guidance system. A yellow recognition box appears in the frame, with the target enclosed in a green box.
5.2 Pre-lock feature
Turn on the remote control to enter pre-lock mode. The color recognition box turns red, and the target appears within it. The system automatically tracks and pre-locks the target, with the red box flashing. If the target is lost, it will be re-recognized and locked.
5.3 guidance function
Guidance mode: The identification box disappears and a red target box appears on the screen. After manual unlocking, guidance is activated to control the aircrafts pursuit flight based on the target position.
6. Install and use
6.1 Battery compartment opening and battery installation
First, press the battery compartment lock.
Step 2: Rotate the battery compartment to the left. If it hits a block, pull it back to open the compartment.
Shown below:

Step 3: Install the battery and connect the XT90 terminals. Do not reverse the polarity, as it may damage the devices electronics.
Step 4: Align the battery compartment cover with the fuselage notch, insert it, then rotate it backward until the battery compartment lock aligns with the fuselage notch. Finally, press the lock to secure it in place. The procedure is illustrated below:

6.2 remote frequency
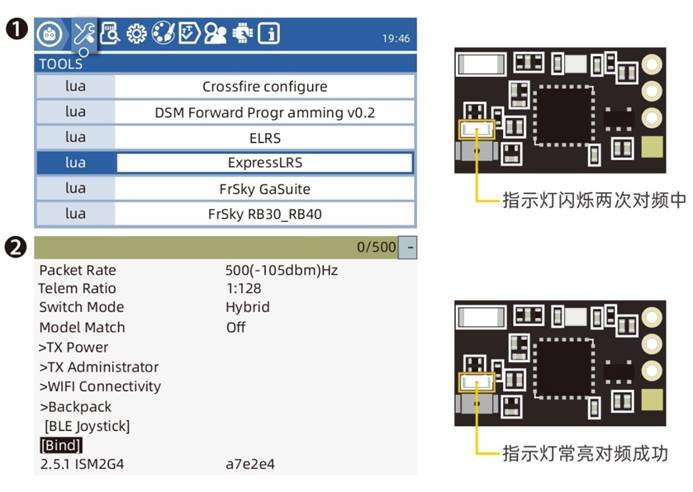
Power the aircraft on and off three times to activate the receivers binding mode. The receivers LED will flash twice rapidly, indicating it has entered frequency alignment mode.
For the RadioMaster TX16S remote control, press and hold the SYS key to enter the TOOLS interface. Swipe down to select Express LRS, then choose Bind and press OK. (The tab sequence may vary slightly for other models.)
When the receiver has a stable on light, it indicates successful frequency reception. The interactive interface is as follows:
6.3 Focus on screen usage and frequency alignment
- brief introduction

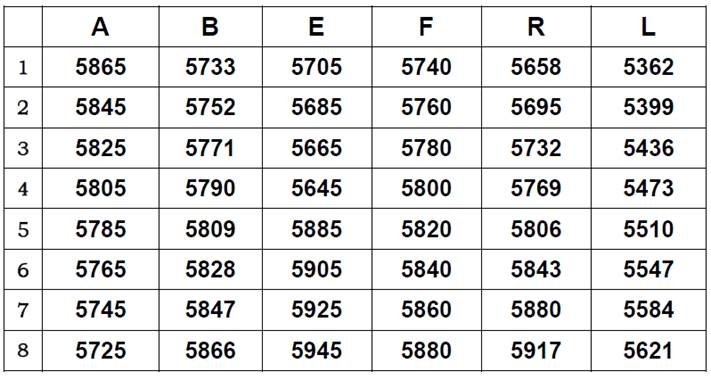
In the frequency group, you can manually set six frequency groups (A, B, E, F, R, L) or select scanning mode to perform frequency search.
Select “Scan”, press OK to confirm and enter automatic search, or long press the up button to automatically search channels. (Note: Automatic search can only be used in the FPV interface.)
Supports 48 frequencies at 5.8 GHz. You can set the frequency to the corresponding frequency through frequency groups and individual frequencies.
matters need attention
1. Before powering on, ensure all antennas are properly installed to prevent component damage.
2. If you are using it with other 5.8G devices, select a different channel.
6.4 Pre-flight inspection
- Check for any damage to the high-speed drones exterior. If damage is found, inspect or repair it.
- Check if the propeller is turning correctly and ensure the propeller screws are tightened.
- Check if the straps are tightly secured around the battery, and adjust or secure the battery properly.
- Check the battery voltage. When fully charged, the 8S battery should show 33.6V.
- Turn on the remote control and ensure the unlock switch is locked with the throttle at its lowest position.
- Turn on the FPV goggles or screen to check the connection status and whether the display is working properly.
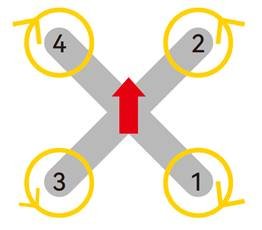
motor steering diagram
6.5 High-speed Kinetic Anti-Drone System and its transmitter connection
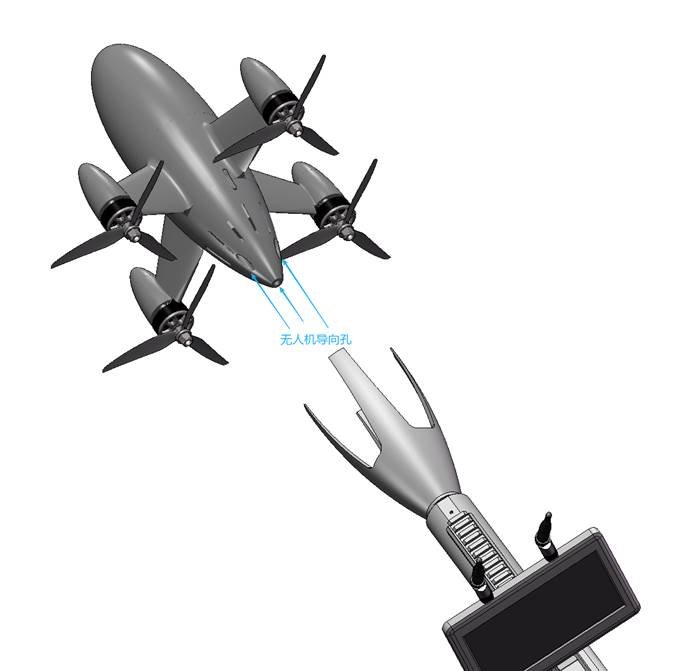
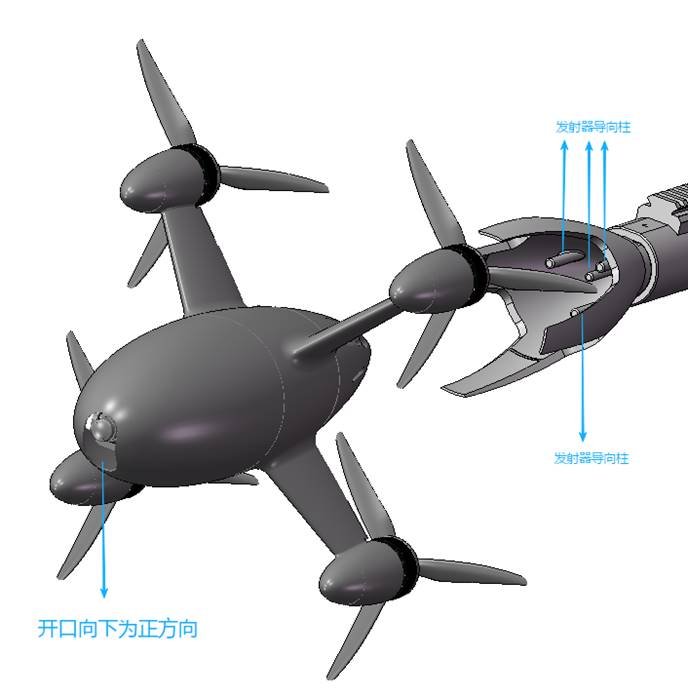
Align the high-speed drone correctly and insert the guide post into the launch tray to complete the connection.
Do not bend or tilt the insertion, as this may cause the drone to jam with the launch tray or break the guide column!
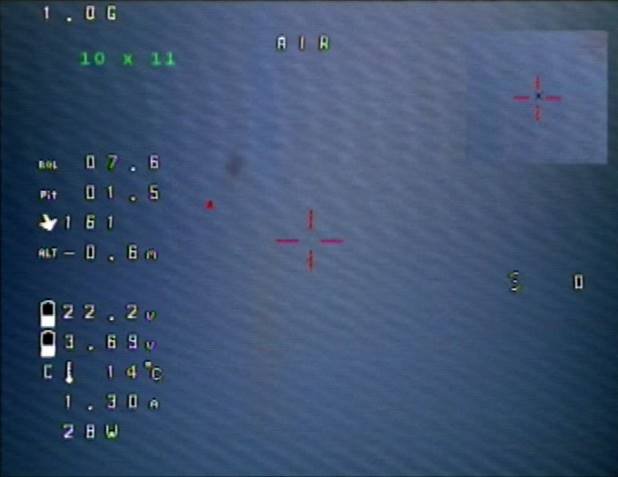
7. High-speed UAV Video Interface and Tracking and Locking Logic
Remote control channel 8, first gear, tracking exit mode. The screen displays a yellow recognition box. If the target appears within the recognition box, a green box will enclose the target. The aircraft is controlled by the remote control. The interactive interface is as follows.
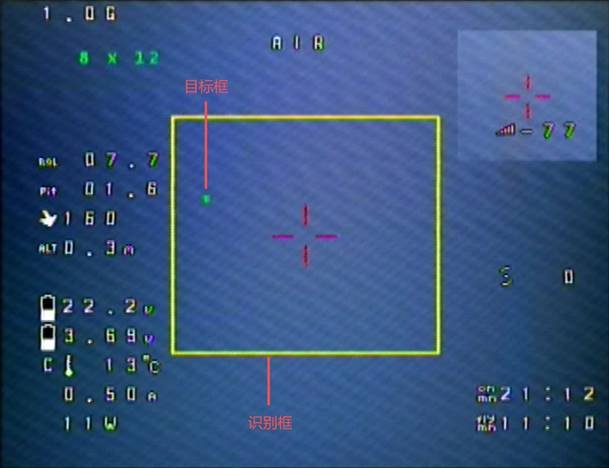
When the remote control is set to channel 8s second level in pre-lock mode, the color recognition box turns red. The target appears within this red box, triggering automatic tracking and pre-locking. The red recognition box then flashes intermittently. If the target is lost, the system will re-recognize and re-lock it. The interactive interface is as follows:

On Channel 8 of the remote control in the third setting (Guidance Mode), the identification box disappears and a red target box appears on the screen. After manual unlocking, the guidance system activates to control the aircrafts pursuit flight based on the target position. The interactive interface is as follows:
8. Technical Parameters of High-Speed UAV
| Body size | 446mm*308mm*308mm |
| bare metal weight | 1.8kg (including battery) |
| maximum load weight | 0.5kg |
| maximum flight duration | ≥3.5 minutes (full load); Speed 200 km/h) |
| maximum level speed | 3 50 km/h (sustained for 10 seconds) |
| maximum range | ≥10 km |
| ceiling altitude | 2km |
| Interception method | Physical collision or end-to-end distance sensing |
| interception accuracy | CEP 2m |
| propulsion mode | lithium cell |
| launch mode | compatible with manual flight/automatic launch interface |
